Feeds:
Posts
Comments

Posts Tagged ‘applique’

Romans 3:22-23

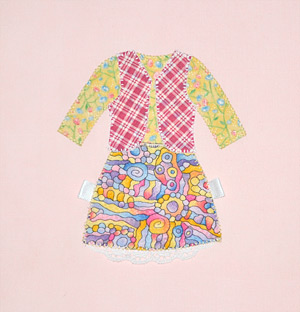
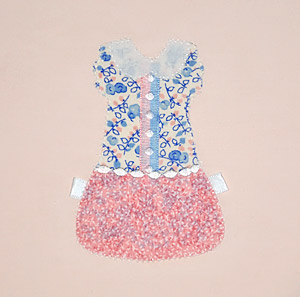
My latest paper doll block has a western feel to it with its pink plaid vest.  I also added a little ruffled lace to the hem of the skirt.

Paper Doll Block 5

Before constructing block five, please read the introduction to this series where you will find helpful information.  You may also want to read through the instructions for blocks  #1-4 since one tutorial builds on another.

Download the following PDF files from BOX in the right margin:  12_LS Boat-Neck Top Applique, 13_ A-Line Skirt Applique, 14_ Vest Applique.

Roughly cut out the printed applique pieces and adhere them to card stock.  Now cut them out true-to-shape.  These will serve as your templates.

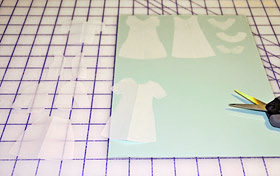
Outline the three templates onto double-sided fusible web.  Flip the vest template to its mirror image and outline it as well.

Outline Templates onto Fusible Web

Roughly cut out the shapes and adhere them to the back of your chosen fabrics.

Stick Fusible Web onto Back of Fabrics

Carefully cut out each applique shape.

Cut Appliques

From a pastel cotton fabric, cut a 7 ½-inch background square.  (Kona cotton is a good choice.) Starch and press the square and adhere a light tear-away stabilizer to the back.

Mark the center of your square background block.  (It is helpful to fold a vertical and horizontal crease into the center of the background square.)  Measure the height of the applique and place a piece of tape at the top and bottom placement points.  This insures that the applique will be centered correctly.

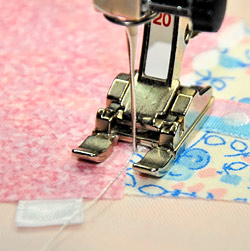
Cut a 4 ½” piece of lace and ruffle it by sewing a 4.0mm straight stitch along the top edge.

Ruffle Lace with 4.0 Straight Stitch

Ruffled Lace

Peel off the backing paper and position the top and a-line skirt onto the background square.  Tuck the lace under the hemline of the skirt and finger press down.

Position Appliques

Cut two 1 ¼” sections from 3/8” wide white satin ribbon.  Fold in half and finger press.  Place one folded tab on each side of the lower skirt by carefully lifting the edge of the applique and tucking the raw edges of the tab underneath.  Finger press the area to re-adhere the fusible.

Following the package instructions, press the applique pieces in place.  Always use a pressing cloth for this step.

Set up your sewing machine with a thread color that matches the top and skirt fabrics.  Blanket stitch around the sides and bottom of the skirt using a 2.3mm  length and 2.0mm width.  If your sewing machine doesn’t have a blanket stitch, simply use a zig zag stitch.

Blanket Stitch Sides and Bottom of Skirt

Change to a satin stitch and stitch across the waistline of the skirt.

Satin Stitch Waistline

Using a straight stitch, stitch up the side of the top.  This part of the applique will be covered by the vest.

Straight Stitch Side of Top

When you reach the sleeve area, change to a blanket stitch and continue stitching until you reach the opposite side of the top.

Blanket Stitch Sleeves and Neckline

Straight stitch down to the waistline.

Straight Stitch Remaining Side

Position the vest pieces in place and press.

Position Vest Applique Pieces

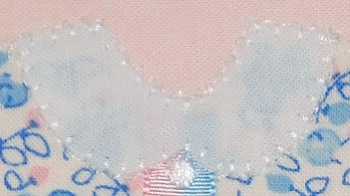
Blanket stitch around both vest appliques.  Change thread colors if necessary.

Blanket Stitch Vest Pieces

Gently remove the backing stabilizer.

Block five is now complete!  Save all your templates so that you can mix-and-match more paper doll outfits in the future.

Check back soon for block six.

Happy stitching,

Nancy

~~~~~~~~~~~~~~~~~~~~~~~~~~~~~~~~~~~~~~~~~~~

My dh and I just returned from Grand Rapids where I took this picture of Lake Michigan.  The weather was cool and breezy all week making it a perfect trip from beginning to end.  Isn’t the lake awesome?

Read Full Post »

Proverbs 3:13-14

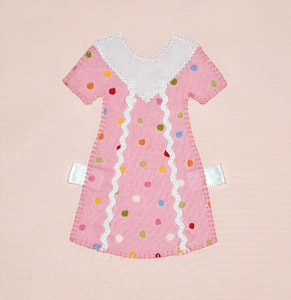
I really like the simplicity of block four.  I’m a comfort dresser so the a-line dress holds  appeal for me.  Are you ready to cut into some more girly fabric?

Paper Doll Quilt Block 4

Before constructing block four, take a few minutes to read the introduction to the series where you will find helpful information.  You may also want to read through the instructions for previous blocks since one tutorial builds upon another.

Download the following PDF files from BOX in the right margin:  10_A-Line Dress Applique and 11_Pointed Collar Applique.

Roughly cut out the printed applique pieces and adhere them to card stock.  Now cut them out true-to-shape.  These will serve as your templates.

Take the A-Line Dress (10) and Pointed Collar (11) templates and outline them onto double-sided fusible web.  Peel away the paper backing, stick the shapes on the back of your fabrics, and cut them out with short-nosed craft scissors.

Outline On Double-Sided Fusible Web

From a pastel cotton fabric, cut a 7 ½-inch background square.  (Kona cotton is a good choice.) Starch and press the square and adhere a light tear-away stabilizer to the back.

Mark the center of your square background block.  Measure the height of the applique and place a piece of tape at the top and bottom placement points.  This insures that the applique will be centered correctly.

To mark the vertical lines where the ric rac will be placed on the dress, fold the dress applique in half.  Fold again about half way and finger press a crease.  I’ve included a picture of the backing paper so that you can see where the lines fall.

Fold Creases for Ric Rac Trim

Applique with Crease Lines

Now position the A-Line dress on the background square.  Cut two 3 ¾” lengths of thin ric rac trim.  Apply a few dabs of fabric glue or basting glue to the back of the trim to help keep it in place as you place it along the outer fold lines.  Tuck the bottom ends under the dress hemline.

Place Ric Rac on Outer Fold Lines

Cut two 1 ¼” sections from 3/8” wide white satin ribbon.  Fold in half and finger press.  Place one folded tab on each side of the lower dress by carefully lifting the edge of the applique and tucking the raw edges of the tab underneath.  Finger press the area to re-adhere the fusible.

Place the collar in position.

Position Collar

Following the package instructions, press the applique pieces in place.  Always use a pressing cloth for this step.

Set up your sewing machine with thread that matches your ric rac and collar.  Using a straight stitch, begin at the hemline and sew the ric rac down.  When you reach the collar, travel along the edge of the point until you come to the second length of ric rac.  Sew down to the hemline.

Sew Ric Rac with Straight Stitch

With a self-threading needles, take the thread tails to the back and knot them.  Trim off excess thread.

Take Thread Tails to Back

With a blanket stitch set at 2.3mm length and 2.0mm width, sew around the raw edges of the collar.

Blanket Stitch Around Collar

Change the thread in your machine to a color that matches your dress.    Now blanket stitch around the raw edges of the dress.  If you don’t have blanket stitch, use a zig zag stitch to secure the edges.

Blanket Stitch Around Dress

Gently remove the backing stabilizer.

Block four is complete!  Save your templates so that you can mix-and-match more paper doll outfits in the future.

Check back soon for block five.

Blessings,

Nancy

Read Full Post »

Psalm 9:9-10

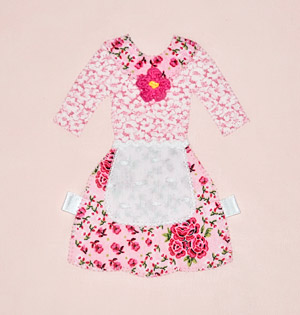
What fun I’m having coordinating one little outfit after another for this paper doll applique series.  Today’s block is graced with a long sleeve top, round collar, full skirt, and apron.

Paper Dolls Quilt Block 3

If this is the first block you’ve clicked on, please read the introduction to the series as well as the instructions for block one.  You’ll find helpful information in those posts regarding the download of needed files and the necessary supplies to insure success.

For block three, download the following files from BOX in the right hand margin:  6_Long Sleeve Top Applique,  7_Full Skirt Applique,  8_Apron Applique,  9_Round Collar Applique.  Follow my previous instructions for making templates.

Outline the templates onto double-sided fusible web, such as Steam-A-Seam Lite 2.

Outline Templates on Fusible Web

Peel the backing paper off and stick them to the backside of your selected fabrics.  Carefully cut out each piece with short-nosed craft scissors and set aside.

Cut Out Applique Pieces

Cut a 7 ½-inch background square from a pastel solid cotton fabric such as Kona cotton.  Starch and press the square and adhere a light tear-away stabilizer to the back.  (I use a 50-50 mix of starch and water.)

Mark the center of your square background block.  You may find it helpful to measure the height of the applique and place a piece of tape at the top and bottom placement points.  This insures that the applique will be centered correctly.

Peel off the remaining backing paper and position your applique pieces on the background square, working from back to front.  For example, place the long sleeve top on the background square first, then the full skirt, collar, and apron.  The pieces are repositionable so don’t worry if you don’t get them positioned correctly the first time.

Placement of Applique Pieces

Cut two 1 ¼” sections from 3/8” white satin ribbon.  Fold in half and finger press.  Place one folded tab on each side of the lower skirt by gently lifting the edge of the applique and tucking the raw edges of the tab underneath.  Finger press the area to re-adhere the fusible.

Using a pressing cloth, heat set your applique according to package directions.  These will vary depending on what brand of fusible you are using.

Cut a thin piece of trim for the apron waistband.  I chose ric rac and used a light dab of basting glue to help keep the trim in place.

Cut Trim for Apron Waistband

Beginning with the apron, sew a small blanket stitch around the raw edges using a matching thread.  I set my blanket stitch at 2.0mm width and 2.3mm length.  When you reach the ric rac areas, switch to a 2.0mm straight stitch.  (Test the decorative stitch on a sample fabric first.)  If your sewing machine does not have decorative stitches, a simple zig zag stitch works quite well.

Straight Stitch Ric Rac

Blanket Stitch Around Apron

Switch to a thread that matches the remainder of the ensemble and blanket stitch around all raw edges.

Blanket Stitch Raw Edges

When you come to a sharp corner, leave your needle in the down position and pivot the fabric; then continue stitching.

Needle Down at Corners

With a self-threading needle, take all the thread tails to the back and tie them off.  Trim off excess thread.

Take Thread Tails to Back and Tie Off

When your block is complete, gently tear away the backing stabilizer.

Since the quilts I make are donated to crisis pregnancy centers, I don’t embellish them with any small objects that could come loose over time.  On this particular block I did add a crocheted flower at the base of the collar.  It is glued and sewed down to the point that it will never come off.

If you are making this quilt for a wall hanging, consider embellishing the blocks with  beads, sequins, Angelina fibers, yarns, or other decorations you have on hand.

Have fun and stayed tuned for block four.

Nancy

Read Full Post »

2 Peter 1:3

Thank you for your kind comments and emails regarding the new block series.  I hope you are enjoying it as much as I am.

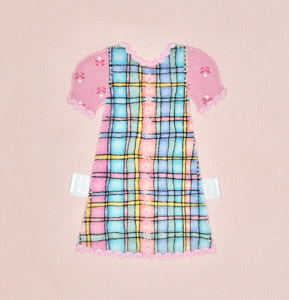
Today we move on to block two, which is a very simple applique design using only two pieces but the results are cute as can be.  One piece is a puffed sleeve top.  Whenever I think of puffed sleeves, my mind immediately goes to Anne of Green Gables.  Remember Anne’s desire for a dress with puffed sleeves?

Paper Dolls Block 2

Before constructing block two, take a few minutes to read the introduction to this series where you will find helpful information.  You may also want to read through the instructions for block one since one tutorial builds upon another.

You will need the following items to successfully complete the paper doll blocks in this series:

  • Small print cotton fabrics
  • Pastel fabric such as Kona cotton for background blocks
  • Fusible stabilizer
  • White satin 3/8” ribbon for tabs
  • Embellishments such as ric rac, ribbon, lace, etc.
  • Embroidery thread
  • Sharp short nose craft scissors
  • Steam-A-Seam 2 Lite or other double sided fusible
  • Card stock for applique templates
  • Sharp thin-leaded pencil for transferring designs to fusible web

To construct block two:

Download these files from BOX in right margin:  4_Puffed Sleeve Top Applique, 5_Jumper Applique.

Roughly cut out the printed applique pieces and adhere them to card stock.  Now cut them out true-to-shape.  These will serve as your templates.

Take your puffed sleeve top (4) and jumper (5) templates and outline them onto double-sided fusible web.  Then peel away the paper backing, stick them on the back of your fabrics, and cut them out with sharp, short-nosed craft scissors.

Outline Templates

Cut a 7 ½-inch background square from a pastel solid cotton fabric.  I recommend Kona cotton.  Starch and press the square and adhere a light tear-away stabilizer to the back.

Using a quilting ruler, mark the center of your square background block.  I find it helpful to measure the height of the applique and place a small piece of tape at the top and bottom placement points.  This insures that the applique will be centered correctly.

Peel off the paper and position your applique pieces on the background square.  They are re-positionable, so don’t worry if you don’t get them right the first time.  Start with the puffed sleeve top. You may want to trim the lower part of the top to reduce bulk.

Trim Top

Decorate the edge of the sleeves with a thin trim such as ric rac.  I use a light dab of fabric glue to help keep the trim in place.

Trim Sleeves with Ric Rac

Now position the jumper over the top and run your fingers over the surface so that the fusible will stick to the background fabric.

Cut two 1 ¼″ sections from 3/8″ wide white satin ribbon.  Fold in half and finger press.  Place one folded tab on each side of the lower jumper by gently lifting the edge of the applique and tucking the raw edges of the tab underneath.  Finger press the area to re-adhere the fusible.

Take the block to your ironing center and cover it with a pressing cloth.  Follow the package instructions for the setting and time in which you press the applique pieces in place.

Set up your sewing machine with embroidery thread; loosen the upper tension slightly.  Choose a decorative stitch and embroider the center area of the jumper from neckline to hemline.  (It’s always a good idea to test your stitch on a sample fabric to make sure the tension is correct and the stitch is to your liking.)  If your machine does not have decorative stitches, use ric rac or some other embellishment to decorate this area.

Add ric rac around the neckline.

Embroider Center of Jumper

Although I didn’t add pockets to the jumper, I think they would be a cute addition at this point.

Now sew a small blanket stitch around all the raw edges.  I set my blanket stitch at 2.0mm width and 2.3mm length.  When you reach the ric rac areas, switch to a 2.0mm straight stitch.  (Again, test the decorative stitch on a sample fabric first.)  If your sewing machine does not have decorative stitches, simply sew a zig zag stitch around the raw edges.

Blanket Stitch Raw Edges

Carefully remove the backing stabilizer.

Since more wardrobe pieces will be coming in future block tutorials, you might want to place pieces #4-5 in a zip-lock bag for safekeeping.  It won’t be long before you can mix-and-match the pieces to create unique paper doll applique outfits.

Block three will be coming soon so check back frequently.

Blessings,

Nancy

Read Full Post »

James 3:17

This is the first block in my new paper doll series.  Please read my introduction to the series before starting this tutorial.  You will find important information in that post entry regarding the download of necessary files and their approved uses.
Paper Doll Quilt Block One
First, you will need the following items to successfully complete the blocks in this series:

  • Small print cotton fabrics
  • Pastel fabric such as Kona cotton for background blocks
  • Fusible stabilizer
  • White satin 3/8″ ribbon for tabs
  • Embellishments such as ric rac, ribbon, lace, etc.
  • Embroidery thread
  • Sharp short nose craft scissors
  • Steam-A-Seam 2 Lite or other double sided fusible
  • Card stock for applique templates
  • Sharp thin-leaded pencil for transferring designs to fusible web

To construct block one:

Download these files from BOX in the right margin:  1_Frock Applique,  2_Low Skirt Applique,  3_Peter Pan Collar Applique

Roughly cut out the printed applique pieces and adhere them to card stock.  Now cut them out true-to-shape.  These are your templates.

Paper Doll Quilt Templates

Use Card Stock for Applique Templates

Transfer the applique shapes to your fusible web by drawing around the edges with a sharp pencil.  Follow package directions to determine which side of the fusible to draw on.

Outline Shape on Fusibile Web

Peal away the paper side of your fusible and place the sticky side on the back of your fabric.  Cut out your applique pieces with a sharp pair of craft scissors, carefully following the drawn outline.  Set aside.

Cut Out Appliques

Cut a 7 ½-inch square from a solid pastel cotton fabric that coordinates well with the fabric prints you have chosen for your appliques.  Starch and press.  Partially back with a fusible tear-away stabilizer.  You can find my favorite stabilizer for quilting purposes here.

Back with Fusible Stabilizer

Mark the center of your square background block.  I also find it helpful to measure the height of the applique and place a small piece of tape at the top and bottom placement points.  This insures that the applique will be centered correctly.

Mark Center of Background Block

Peel away the paper backing on applique #1 (frock).

Peel Away Paper Backing

Position the frock on the background block.

Position Frock

Cut two 1 ¼″ sections from 3/8″ wide white satin ribbon.  Fold in half and finger press.  These are your tabs.

Place one folded tab on each side of the skirt by gently lifting the edge of the applique and tucking the raw edges underneath.  Finger press the area to re-adhere the fusible.

Placement of Tabs

Using back to front order, position the remaining applique pieces on the background block.  For example, place the frock on the background square first, the low skirt second, and the collar third.  Add embellishments as you go along.  I chose to place a ribbon embellishment down the front of the frock.

You can cut away some of the frock that is under the low skirt to reduce bulk.  Add any additional embellishments you would like to accessorize the outfit.

Take the block to your ironing center and covering it with a pressing cloth.  Follow your fusible instructions for the setting and time in which you press the applique pieces in place.

Set up your sewing machine with embroidery thread and an open toe foot; loosen the upper tension slightly.  Choose a nice decorative stitch and embroider the area where the lower skirt meets the frock.  (It’s always a good idea to test your stitch on a sample fabric first to make sure the tension is correct and the stitch is to your liking.)  If your machine does not have decorative stitches, this would be a good place for ric rac or some other embellishment.

Now sew a small blanket stitch around all the raw edges.  I set my blanket stitch at 2.0mm width and 2.3mm length.  Again, test the stitch on a sample fabric first. If your sewing machine does not have decorative stitches, simply sew a zig zag stitch around the edges.

Blanket Stitch

Gently tear away the  backing stabilizer.

Block one is complete!  I hope you had as much fun as I did constructing this adorable block.  Since many more wardrobe pieces will be offered in future block tutorials, you may want to place pieces #1-3 in a zip-lock bag for safekeeping.  It won’t be long before you’ll be able to mix-and-match the pieces to create unique paper doll applique outfits.

Stay tuned for block two, which will be coming soon.

Happy stitching,

Nancy

Read Full Post »

Applique Paper Dolls Preview

I don’t know when I’ve had so much fun designing quilt blocks.  It all goes back to a few months ago when my little granddaughter came for a visit.  She’s all girl, lives in a world of pink, and loves paper dolls.  Before she arrived, I purchased the Princess set of “paper” dolls made by Melissa & Doug.  Of course, they’re not paper at all but sturdy pressed wood with magnetic ability to hold all the clothing to the doll.  Where was Melissa and Doug when I was young?

As I watched her dress the doll this way and that, my brain began translating the activity into fabric and fusibles.  So I went to work drawing simple little dresses, skirts, tops, vests, jackets, collars, and other clothing items on paper.  I then adhered the pieces to card stock and cut them out to serve as my templates.

Paper Doll Quilt Templates

Since the pieces were small, I did a test block to make sure the entire process “worked.”  Worked it did, and so I’m now beginning a new appliqué quilt block series that I believe you will thoroughly enjoy sewing and quilting along with me.  At this point, I’ve only constructed two blocks so this is a work-in-progress.  I haven’t even come to a final decision on lattice or block borders.  But first things first–on to the blocks.

Every time I post a new paper doll quilt block, you will find the necessary appliqué files in the blue BOX in the right margin of the blog.  Click on the file you need and choose “download.”  The files are in PDF format and copyrighted for your personal use only.  Feel free to use them for quilted gifts and charity items but not for commercial use of any kind.  If you have any questions regarding use of the files, just email me.

Once you’ve downloaded the files, print the appliqué pieces, cut them out, and adhere them to something substantial like cardstock.  (I find that spray adhesives that gum up your needle and you wouldn’t think of using again with fabric work great for this purpose.)

I hope you enjoy making these paper doll blocks along with me.  In fact, I would love to see all the cute outfits you come up with from the various mix-and-match appliqué pieces I’ll be posting.

Blessings,

Nancy

Read Full Post »

Philippians 4:6-7

I always keep my eyes open while shopping outside of quilt stores for things that can be implemented for quilting purposes.  One day I found these ultra thin metal circles called “eyelet charms” in the scrapbooking section of a craft store.

Eyelet Charms

There are twelve charms in the pack, measuring from ¾” to 1 ¾”.  I knew immediately they’d be the perfect template for appliqué circles.

Here is how I use them.  First, rough cut a circle of fabric about 1/2” larger than the circle template you are using.

Rough Cut Around Template

Thread a needle with sewing thread, using both strands, and sew a running stitch around the edge of the fabric circle as shown.  Do not cut the thread.

Sew Running Stitch Around Edge

Place your metal template in the center of the wrong side of your fabric circle.

Place Template in Center

Pull the thread taut, allowing the fabric to envelop the sides of the template.  Even out the pleats a little if necessary.  I usually take a few more running stitches, holding the thread tightly, and then tie the thread off with a few repeated back stitches.  The fabric should be quite snug.

Pull Stitches Tightly

Take your fabric-covered template to the ironing board.  With a strong solution of starch (mine is 50-50 starch to water), saturate the fabric on both sides.

Saturate Fabric with Starch

Heat your iron to a cotton setting and begin pressing from the outside edge inward, slowly working your way around the circle.  When the pleated side is crisp and dry, turn the circle over and press the other side until dry.  Metal can get hot so use caution before picking the circle up with your hand.  (Personally, I’ve never found the metal to be a heat problem because it is so thin, which means it cools quickly.)

Press Until Crisp and Dry

With your super-crisp circle in hand, apply some temporary basting glue to the back side.  The key here is to make sure it’s applied to the outer edges of the circle.

Apply Basting Glue

Place your circle in position on a quilt block and gently press down with your fingers.  Then turn the block over and press around the edges of the circle.  Allow to dry for about 15-20 minutes.

With a pair of appliqué or craft scissors, cut a small hole into the back side of your quilt block at the center of the circle template.  Carefully cut away the backing a quarter-inch from the edge of the metal template.  You should see most of the metal template at this point, with only a quarter-inch of its edge being hidden by fabric.

Cut Away Backing

Since the glue isn’t fully dried, the fabric will be flexible.  Gently lift the edges of the fabric around the template.  Now wiggle the metal template until it comes free.  Finger press the edges back into position.  Don’t worry about ruining your perfect circle as you work this step.  The fabric will immediately go back in place once the template is removed.  If the template will not come out, it’s probably because you haven’t cut away enough of the backing.  A quarter-inch always works for me.

Remove Metal Template

On the surface of your quilt block you now have a perfectly round circle.  However, it hasn’t been stitched in any way.  Sometimes I use invisible thread with a slight zig-zag stitch to tack the circle down.  Other times I simply wait and incorporate any circles into my quilting design.  The choice is yours.

Perfect Applique Circle

Perfectly Round Circle Applique

If you can’t find these metal charms, there are heat-resistant template plastic circles available in quilt shops and online.  These cannot take the heat that metal templates can, so you must handle them differently or they will warp.

I hope this tutorial will encourage you to add some circles to a future quilt project.  I think you will find the process rewarding.

Happy quilting,
Nancy

Read Full Post »