Feeds:
Posts
Comments

Archive for the ‘Thread’ Category

Psalm 119:1-2

I spent last week enjoying the company of my two oldest grandchildren, ages 5 and 6.  My granddaughter loves dressing dolls, including paper dolls, which gave me an idea for a quilt.

While working on the Quarter Turn blocks the week before, I also had another block idea pop into my head and got a little side-tracked with it during the quilting process.  All that to say, I missed posting last week.  But I’m pleased to report that I finished the Quarter Turn quilt this morning.

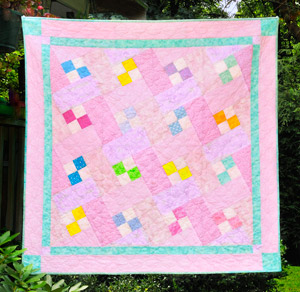
Quarter Turn Quilt

After sewing all the Quarter Turn blocks together, I added a small framing border and then a larger pink border with corner squares.  I used Valdani variegated Baby Joy cotton thread (50 wt.) on the front of the quilt and a solid pink cotton thread on the back.

Valdani Baby Joy Cotton Thread

I alternated the turquoise and green prints for the binding.

Quilt Binding

Here’s a close-up of the quilting.

Wave Stitch Diagonal Grid Quilting

I love this quilt and know it will make some little girl very happy.

Hope your week is filled with quilting.

Nancy

Read Full Post »

John 10:14-15

In my tutorial on the Four-Patch Surrounded block, I noted that this block takes on a log cabin appearance when alternated vertically and horizontally.

Four-Patch Surrounded Quilt

I began this quilt project two days ago and finished it this morning.  And this with family in town!  It’s amazing what one can accomplish in the wee hours of the morning and after everyone else is in bed.

In no time, I had sixteen blocks constructed, ready to be sewn into rows.  I added two borders:  an inner border in dark blue and an outer border in lime green.  I then put together my quilt sandwich with natural cotton batting and proceeded to quilt the entire top yesterday afternoon after my family left.  I chose to quilt it with a wavy crosshatching design using Valdani “Over the Rainbow” 35wt. variegated cotton thread.

Quilted with Valdani Cotton Thread

I cut the binding last night and attached it this morning, using my favorite method of zig- zagging the seam allowance with fusible thread.

Attaching the Binding

Finishing the Binding Tails

Filling Bobbin with Fusible Thread

And here it is.

Four-Patch Surrounded Completed

I really enjoyed this project and believe you will be surprised at how quickly it can be completed.

Happy quilting,

Nancy

Read Full Post »

1 Peter 1:4

I don’t know about you, but I have lots of leftover binding strips.  Why not use them to add some framing to your quilt labels?  It’s so easy to do and adds a special touch to the back of your quilt.

Normally, I place my label in the bottom left hand corner on the back of my quilt.  Where you position your label is entirely up to you.

Completed Quilt Label

First, I sew the binding to the label on the sides I need it to cover.  Since the label bottom and left side will be buried in the seam allowance, I leave these as raw edges.  The binding is applied to the label in the same manner as it is applied to the quilt sandwich.  I turn the corners just as I do in part two of my binding tutorial.

Binding Sewn to Exposed Edges

Next, I place a few strands of fusible thread on the reverse seam allowance and press the rolled binding for a few seconds with a steam iron (cotton setting).  If you prefer, you can zig-zag around the seam allowance with fusible thread in your bobbin as I demonstrated in part three of my binding tutorial.

Pressing Binding to Wrong Side of Label

Once my binding is secured to the reverse side of the label, I’m now ready to position the label on the back of my quilt.  I tuck the bottom and left raw edges into the seam allowance and place strands of fusible thread on top as shown.  I then fold the binding back onto the seam allowance and steam press, being careful to press only the binding, not the quilt.

Positioning Fusible Thread Strands

To adhere the upper part of the label, I strategically place fusible thread stands under the binding edge and again steam press for a few seconds.  My goal here is to simply tack down the edges until I blind stitch them to the quilt.

Upper Label "Tack Down"

Wasn’t the simple?  I find so many uses for fusible thread.  Every time I cut a fusible thread tail, I place it in this small plastic bag, always ready for action.

Fusible Thread Tails

Since I’ve mentioned fusible thread numerous times, here is a list of some online sources where you can purchase this helpful product if you can’t find it at your local quilt shop.

Create For Less

Red Rock Threads

Nancy’s Notions

nrw

Read Full Post »

John 10:14-15

In part two of this tutorial, I demonstrated how I sew binding to a quilt.  Now I will show you how I prepare the edges of a quilt as I complete the binding process.

First, I take a quilt ruler and measure out to about a quarter-inch of the batting from the quilt top edge and trim with a rotary cutter.  I leave this much batting in order to fill my binding.  You don’t want empty binding, especially if you are thinking about showing your quilt.

Trim Batting to a Quarter Inch

Next, I trim the batting at the corners since this area can be bulky.  I still keep a point on the batting since I want sharp corners.

Trim Corners, Keeping a Point

I set the stitch length on my sewing machine to 3.0 mm and the stitch width to 4.5 mm.  Using a bobbin filled with fusible thread, I now zig-zag stitch around the perimeter of my quilt.  (Fusible thread will be on the back side of the quilt binding seam allowance.)

Zig-Zag Stitch with Fusible Thread in Bobbin

Fusible Thread on Back side of Quilt

It’s now time to press the binding in place.  I set my iron on steam and a cotton setting.  Rolling the binding to the wrong side, I steam press it in place.  I love this method because it avoids all pinning.

Steam Press Binding in Place

Once the binding cools, I blind stitch the intersection of my binding tails for extra security (this is optional).  I then hand stitch the binding on the wrong side of the quilt.

I used my macro lens so that you could see some close-ups of my corners as well as the tail intersection.

Front Corner Binding

Back Corner Binding

Binding Tail Intersection

Binding really is the happy ending to each quilt adventure.  I hope you find my methods helpful.

nrw

Read Full Post »

John 8:12

In part one of this tutorial I showed you how to create double-fold binding.  Now I’m  ready to apply the binding to my quilt.  There are two preparatory steps that will make this process much easier.

First, I need to make two pencil marks on the batting in each corner of my quilt.  These marks show me where to stop sewing and where to start sewing again as I traverse the corners.  With a quilt ruler, I mark a quarter inch from the point on each side of the corner.  If you prefer to mark with quilt pins, that works just as well.

Make Quarter-Inch Marks at Corners

The second preparatory step involves the 3/8” fold I made on one end of my binding.  This step simplifies the problem of what to do when my binding tails meet.  I fill a bobbin with fusible thread.  On the wrong side of the 3/8” diagonal fold of my binding, I zig-zag stitch (3.0 length, 4.0 width) along the fold line, leaving a little space between the fold and the stitches for a few optional tack-down stitches later.

Zig-Zag Stitch with Fusible Thread

Leave a Small Space

I begin placement of the binding about 2/3 of the way down the left side of my quilt.  This is important because the human eye tends toward centers.  The symmetry of your quilt flows more gracefully if there are no unnecessary broken lines in these positions.  (If you want to begin 1/3 of the way down, that’s just fine.)

Begin Off Center

For the method I’m using, I open my folded binding up for the first 7-8 inches and begin sewing it to the quilt with a quarter-inch seam allowance.

Open Binding for Beginning Stitches

When I’ve completed stitching for 7-8 inches, I fold the binding back and continue sewing.  This forms a little pocket at the beginning of my binding.

Fold Back Binding and Continue Sewing

As I’m sewing, I like to put my roll of binding on top of the quilt itself rather than allowing it to dangle over the side of my sewing surface.  The weight of the binding can add drag as you sew, which isn’t a good thing.

Roll Binding, Place On Top of Quilt

When I reach the first corner, I stop sewing at the quarter-inch marking (or pin).

Stop Sewing at First Quarter-Inch Mark

I then lift the presser foot with needle in the down position and turn my quilt so that I can stitch up to the batting.  I clip my threads and remove the quilt from under the presser foot.

Stitch to Batting

I now fold my binding away from the quilt corner, forming a right angle.  The binding should be even with the second edge you are about to sew.

Fold Binding Away From Quilt

Next, I fold the binding onto the quilt’s second edge.  Most instructions will tell you to keep the fold even with the edge of the quilt.  I actually prefer to let the fold extend about 1/16th of an inch past the edge.  This tiny bit of extra fold gives me a beautiful square mitered corner that I don’t get when I keep the folded edge even.  There’s a lot of stuffing in the corners that tends to add roundness.  This provides the antidote.

Allow Fold to Extend 1/16 Inch

With my binding in place, I now begin stitching at the next marked quarter inch, taking a backstitch to secure the thread.  I sew until I come to the next corner and repeat the above process for each remaining corner.

Begin Stitching at Second Mark

As the binding approaches the starting point, I stop sewing with the needle in the down position.  I then cut the binding tail a few inches past the beginning stitches of the pocket.

Trim Binding Tail

I fold in edge of the tail, creating a diagonal fold, and then trim along the fold line.  Make sure your tail extends beyond the opening of the pocket.  You don’t want to come up short here. It’s easy enough to eyeball this process.

Make a Diagonal Fold

Cut Along Fold Line

Folding the pocket back over the tail, I insert a few pins to keep the intersection snug and then sew until I meet with my beginning stitches.

Tuck in Tail and Pin

Sew Until Stitches Meet

Removing the quilt from under the presser foot, I now take it to the iron and steam press the fusible thread pocket for about 6-7 seconds.  I only press the binding area, not the quilt.

Press Binding Intersection

In part three, I will show you how I prepare the edges of the quilt for a successful and happy ending.

nrw

Read Full Post »

There is one product I use repeatedly and keep well stocked:  fusible thread.  Fusible thread is unique in that it eliminates the need for basting and pinning on lots of sewing, quilting, and craft projects.  Manufactured by several companies, fusible thread can be found online as well as in sewing and quilting stores.

Fusible Thread

Here is a partial list of applications where fusible thread can be used:

1.  Positioning pockets in general sewing
2.  Adhering hems without pinning
3.  Positioning zippers before sewing in place
4.  Positioning trims such as Ric Rac
5.  Positioning appliqués
6.  Adhering bindings

Although the directions for fusible thread state that it can be used in the needle, I prefer to use it in the bobbin since it’s rather thick.  I always keep an extra bobbin wound with this thread handy.  I also keep the thread tails in a small plastic bag for future use.  Sometimes you just need a small amount of adhesion and these thread tails fit the bill.

Fusible thread is activated by the heat of an iron.  Never place a hot iron on the thread itself.  Press with steam from the reverse side, using a temperature appropriate for your fabric.  Allow the fabric to cool before touching.

You will be seeing fusible thread in some of my upcoming quilting tutorials.  If you’ve ever pricked your finger on a pin while quilting or sewing, this product is for you.

nrw

Read Full Post »

Sewing spaces have a way of collecting clutter at light speed.  Sometimes when we’re piecing our quilts, we don’t want to stop and wind bobbins.  Here’s a tip that you may find helpful.

If I know I’m going to be using a certain color of thread a lot, such as gray, I wind several bobbins before I begin my piecing.  My tip concerns those thread tails that tend to unwind when bobbins are not secured.

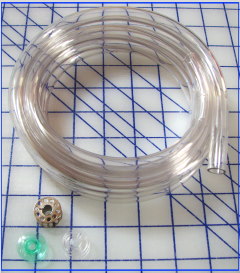
I purchased some clear plastic tubing (3/8-inch diameter) at the hardware store.

Plastic Tubing

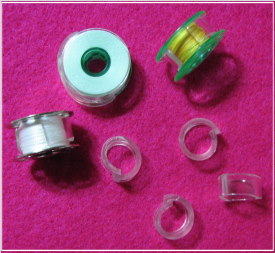
I then used a utility knife to cut “rounds” the interior width of my bobbins (think safety when using a utility knife!).  Next, I slit an opening in the rounds so that they could be wrapped around bobbins to secure the thread ends.

Secured Bobbins

Bobbins add up over time, so I’ve found this method keeps things a bit more tidy.

nrw

Read Full Post »

Generally speaking, 100% cotton fabrics are used in most quilt projects.  Exceptions would be art quilts, where creativity drives decisions more than hard and fast rules.  When using cotton fabrics, it is best to match them with 100% cotton thread since they are both natural fibers.  Using a stronger synthetic thread could cut through the fabric over time.

The market provides quilters with numerous thread choices, leaving some new quilters confused.  To educate yourself on thread types, sizes, weights, and proper needle choices, read YLI’s A Thread of Truth.

Additionally, here are some further links that you may find interesting and helpful:

Superior Threads
Sulky
Red Rock Threads
Valdani Thread

When I shop for cotton thread to be used for piecing, I like to look closely at the spool.  Does the thread look fuzzy?  If it does, you will later find a lot of fuzz around your bobbin case and the bed of your machine.  Fuzzy threads can also cause problems with the thread tension on our sewing machine.  Buy quality thread (50wt – 60wt) and your machine will thank you for it.

When your quilt top is complete and you move to the quilting stage, a new host of choices confront you.  In the picture below you see monofilament thread.  Monofilament thread is used for machine quilting when the quilter wants the hills and valleys of her quilt pattern to show, rather than thread color.  This thread comes in nylon and polyester, smoke and clear.

Many quilters prefer 100% cotton threads in weights ranging from 35wt to 50wt for their machine quilting.  Hand quilters often use a glazed cotton thread.  The only caveat is to keep the glazed thread away from your machine.

Cotton threads come in a large variety of beautiful colors, both solid and variegated.  And believe it or not, quilters put as much importance on thread choices as they do on fabric selection.  So spend some time getting to know your options; the knowledge will make you a better quilter.

Read Full Post »